Easy Cool Grim Reaper Drawing
How To Draw The Grim Reaper
Learn how to draw the Grim Reaper, the personification of death, with a scythe and hourglass. An piece of cake spooky cartoon cartoon for Halloween.

Today we will learn how to depict the Grim Reaper, the personification of decease. He is unremarkably pictured as a skeleton dressed in a long mystical robe, with two tools of the merchandise - an hourglass to measure when a person's time is upwardly and a scythe to cut the "thread of life" once their time is over. While drawing a skeleton might exist complex, our drawing Grim Reaper drawing is actually very easy since he is all hidden in a simple to draw robe. For the head, we will utilize a variation on the uncomplicated skull drawing we have washed previously. All just in time to expand your spooky Halloween drawings collection.
pencil
,
eraser
,
colour pencils
drawing paper
or
sketch book
Dearest drawing? Never miss a tutorial!
How to draw the Grim Reaper: base sketch
Step 1 : Sketch the Grim Reaper'southward head
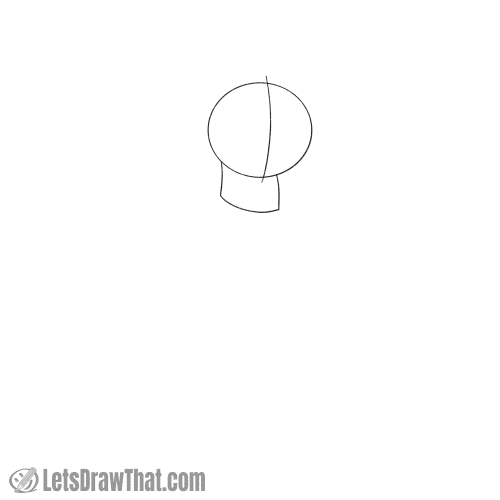
Allow's start the Grim Reaper drawing with the base of operations caput (or skull) shape. This is the same sketch as in the skull drawing tutorial - only this time the entire head is turned sideways. Depict a circle for the main function of the skull, with a curved rectangle that is fastened at the bottom - that will be the jaw. Mark a vertical curved line through the middle of the caput circumvolve to help us identify the facial features afterwards.
Step two : Sketch the long cloak

A Grim Reaper cartoon would non be complete without a mysterious cloak to hibernate him - that is what we are drawing in this step. Draw a rhombus that is a little larger than the head for the hood. Notice how information technology is offset, with more infinite to the left, to give the hood the correct perspective. The base shape for the cloak that hides the body is quite simple - two curves from the hood down, widening out as we get to the footing. Shut the shape with a curved bottom line. In that location you lot go, now our Grim Reaper sketch looks a scrap like a chess slice.
Step 3 : Sketch the scythe and hourglass

Let'southward add together the 2 tools of the trade that Grim Reaper needs - an hourglass that measures when time is up and a scythe to cut the "thread of life". Drawing a scythe is very easy. It'south fabricated from just 2 shapes - a long, curved, pointed triangle for the blade attached to a long, curved handle. Next, draw the hourglass. For the sketch, nosotros volition only mark out the basic shape. Draw a rectangle to point the overall size of the hourglass. Then depict two diagonal cross lines from one corner to its opposite to indicate the hourglass' bulbs.
Step 4 : Sketch the Grim Reaper's arms

Following on with the robes, let's draw some arms to hold the scythe and hourglass. These are two triangle-similar shapes - one to indicate the upper arm and one bending dorsum or upward to make the lower arm with dainty wide robe sleeves.
Step v : Sketch the hands and robe details

Permit's depict some skeleton hands adjacent. Since this is a simple cartoon cartoon, we only demand iii-finger hands. The fingers are drawn every bit iii triangle or carrot shapes next to each other for each paw. The palms aren't visible from this angle, so you don't need to depict those here. Next, add a piddling more detail to the robes by drawing the sleeve openings equally simple curved lines.
Step 6 : Sketch the Grim Reaper'southward face

The Grim Reaper looks very happy every bit he watches the last grains of the sand falling through the hourglass - so allow's sketch in the nuts of that happy skeleton face (well, equally it turns out cartoon skeletons tin take happy-looking faces). Start with two ovals for the optics and a small upside-downwards "Five" shape on the centerline for the nose. The next part is trickier - drawing the jaw. Kickoff by drawing iii "teeth" on the bottom of the head circle for the upper jaw. Then draw the lower jaw "teeth" with a straight line as the top border. Double up the line for the left jaw bone. The final item is to draw the pocket-sized triangle peak for the cheekbone.
Step vii : Improve the robes and hood

Let's add some particular and interest to the Grim Reaper'southward clothes. Widen out the robe at the ground past adding actress triangle shapes to the sides. Adjacent, add some extra folds to the hood. Draw the bent-downwards peak of the hood first. Then add ii extra corners at the bottom of the hood. Finally, depict the two inner hood edges across the forehead, that will mysteriously shade and hide the Grim Reaper'south face.

How to depict the Grim Reaper: outline cartoon
Pace i: Draw the Grim Reaper's face

Let's outset outlining the Grim Reaper cartoon and improving on the roughly sketched details. Outset past drawing up the face and the hood around it. Start, depict the 2 hood edges, rounding off the left corner. And then draw the parts of the eye ovals not hidden by the hood. Thicken out the nose, similar to the heart shape in the skull tutorial. Utilize the sketch lines on the jaw to describe both upper and lower teeth as rounded bumps. Cease the face line and lower jaw, rounding off any abrupt corners.
Step 2: Draw the hood

Next, outline the hood of the robes. Follow the sketch lines, but notation how we are jumping betwixt the sketch lines for the outer shape and leaving gaps in the outline to suggest the folds in the hood. And as usual, round off any sharp corners.
Step 3: Describe the Grim Reaper's hands

Draw the Grim Reaper'due south fingers next. Just outline the "carrot" fingers and add two curved lines to split each finger into three bony segments. Wow, that was an easy step.
Stride 4: Draw the scythe and hourglass

Now it is time to draw the Grim Reaper's tools properly. Outline the bract of the scythe with direct curves every bit it was in the sketch. Then, describe the scythe handle with a bumpy and craggy line to advise the rough wood, much like the witch's broom. Describe the hourglass next. Thicken the top and lesser lines and extend them slightly out over the rectangle sketch to describe the hourglass base of operations plates. And then round off the glass bulbs as ii "U" shapes meeting at the center. Finally, draw the two side lines to terminate the frame.
Pace v: Depict the robe sleeves

Let's depict the Grim Reaper's robe adjacent, starting with the sleeves. The outer edges are a direct outline of the sketch. The pocket-sized improvement here is the slight wobble added to the sleeve ends to suggest the textile folds.
Step 6: Draw the rest of the Grim Reaper'due south robes

Finish drawing the robes. Add some wobble to the border line on the ground to suggest the folded fabric over again. And then outline the robe edges, post-obit the sketch lines, simply not all the way. Leave out gaps at the lower part of the robe where it flattens out onto the ground as we are showing in the picture.
Footstep 7: Shade in the inside of the robes and add final details

Here come the last improvements to our Grim Reaper drawing. Fill in the optics, within of the jaw, inside of the hood, and the within of the robe's sleeves in black. Depict a few extra fold lines on the sleeves and going across the robe to show the way it moves. And finally, describe a light edge double-up line on the scythe to suggest the sharpened blade.
How to draw the Grim Reaper: finished drawing
How to depict the Grim Reaper: finished outline drawing
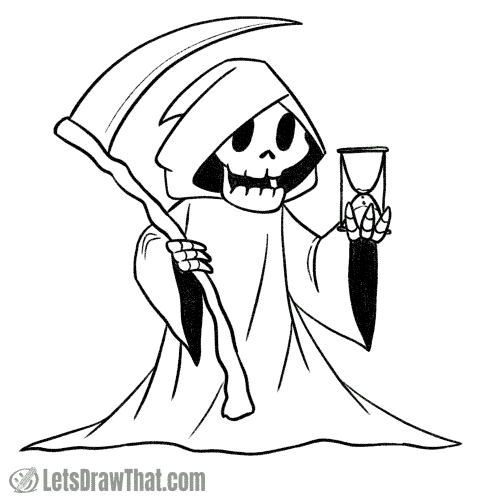
And here is the cleaned-upward final issue of our "how to depict the Grim Reaper" tutorial - Death himself in his full celebrity and might. Well, with that cheeky happy grin, our cartoon Grim Reaper does non look that scary - simply spooky plenty to aggrandize your Halloween drawings collection.
How to depict the Grim Reaper: finished cartoon coloured-in
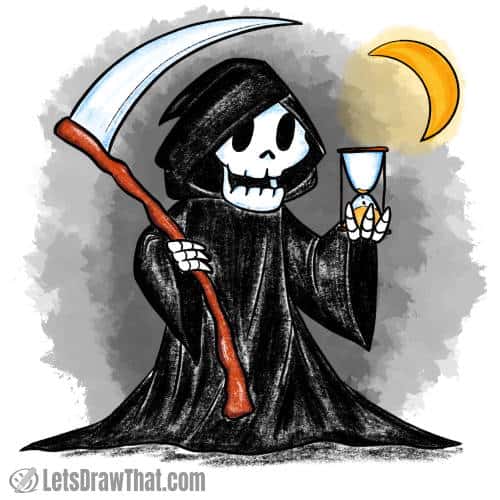
And finally, hither is the coloured-in movie to consummate our "How to draw the Grim Reaper" tutorial. The Grim Reaper'south robes are black, with some darker black for the already filled in areas. Leve out some white forth the inner lines to make the robe folds noticeable. The bones - the skull and the fingers - are white. Hmm, can the black and white film be called a coloured-in drawing...? To add at least a bit of colour, nosotros have drawn the scythe handle in warm wood chocolate-brown, with light blueish shading on the blade and the bulbs of the hourglass. The sand in the hourglass is yellowish, and we as well take drawn in a nice yellowish moon shining through the black dark to add some warm color to the picture show for contrast. And that is the end of the tutorial - now you know how to draw the Grim Reaper!
Like this tutorial? Share it with others:

Love cartoon? Never miss a tutorial!
Become notified when there is a new tutorial published on Let'southward Draw That! (2-iv times a month)
Check out the latest tutorials:
Like this? Share the fun with others:

norrisbusiouty1960.blogspot.com
Source: https://letsdrawthat.com/how-to-draw-the-grim-reaper/
0 Response to "Easy Cool Grim Reaper Drawing"
Postar um comentário